With such a plentiful harvest every summer, I would often reap the benefits of their hard labor and wake up to bushels of raspberries in a bag hanging from my front door knob. Baskets of tomatoes on my door mat. And dozens of zucchini in my mailbox. Every. Single. Day. It was wonderful and I was always appreciative. But what does one do with dozens of zucchini daily? I baked zucchini bread, roasted it, grilled it, sauteed it, blanched it, froze it...after a while, I was a little zucchini-ed out. But I hated to see all of those beautiful fruits (and yes, they are fruits!) go to waste. So I decided to start experimenting. I had never actually eaten a zucchini cake before, but I had heard of them and had come across recipes now and again, but I wasn't exactly sure what they were supposed to taste like. So using a very basic recipe I found online as a guideline, I set out to make the perfect zucchini cakes. And I'm pretty sure, after a lot of trial and error, I nailed it. You be the judge.
Easy Zucchini Cakes
Makes about 12 large cakes, 2 per serving.
Here's what you'll need:
- 2 Medium Zucchini
- 3 Eggs, beaten
- 1/2 c. Seasoned Bread Crumbs
- 3/4 c. Kellogg's ™ Corn Flake Crumbs
- 2 Tbsp. Minced Garlic
- 1 Tsp. Dill (fresh or dried)
- 1 Lemon to zest
- Salt & Freshly Ground Black Pepper, to taste
- Canola Oil
Special Equipment Needed:
- A Mandolin equipped with a julienne blade or a large holed cheese grater
1. Wash and dry zucchini thoroughly. Cut off the round ends and leave the tops on. They act like as a little handle and make holding the zucchini easier. Julienne your zucchini. If you don't have a mandolin with a Julienne blade, a cheese grater works just as well. I like my zucchini a little chunkier in this recipe and the mandolin works well.
2. Julienne/grate your zucchini until you have a lovely little pile like this:
3. Combine seasoned bread crumbs with the Corn Flake Crumbs. (Can we talk about Corn Flake Crumbs for a moment? They are spectacular. I promise. They are one of my best kept cooking secrets and it the thing that makes people ask, 'How did you get this so crunchy?' Corn Flake Crumbs are how. Once you purchase them and try them, you will wonder how you ever cooked without them before. More on those later.) Add your dill, salt, pepper and couple of good zests of the lemon and mix well. I zested almost an entire lemon for this recipe. Remember use only the yellow of the lemon, and avoid the white pith!
4. Take your pile of zucchini and place in a clean kitchen towel and squeeze. Then squeeze some more. You want to get as much moisture out of it as possible. If not, your cakes are going to be all soupy and gross and no one wants that. These were a little on the dry side, but its worth squeezing just in case.
5. Gently combine zucchini, garlic and eggs in a separate bowl from the bread crumb mixture. We aren't going to combine the wet ingredients with the dry ingredients until the very last possible minute. I think this makes for a crispier cake that's less like an omelet and more like a potato pancake or latke.
7. Fold wet ingredients with dry ingredients, taking care not to break up the zucchini too much in the process.
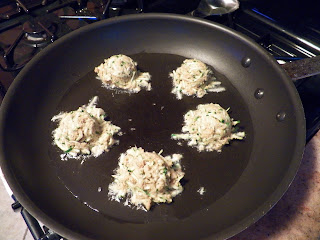
Now grab a large tablespoon or ice cream scooper if you have one. Scoop a good sized portion into the frying pan until your pan is full. Press each ball down with a spatula to flatten.
8. Give your cakes some room in the pan, you don't want to crowd them. Brown on both sides. Aprrox. 3 minutes per side. Use your judgement. You want them golden brown.


No comments:
Post a Comment